Writing a Facebook Messenger chatbot with AWS Lambda and Terraform


There's a lot of buzz around about exposing services as chatbots. Whether that's interactive chats to help you book travel, or a simple Slack bot that lets you run a build, they're turning up everywhere. (Although as usual, nothing on the Internet is truly new: old hands will remember things like infobot lurking in IRC channels) To me, it's a little like the next step on from exposing your service as an API; except instead of allowing other people to write programs to interact with it, you allow them to interact with it directly simply by talking to it.
So what is a chatbot on a technical level? If we follow the pattern used by many modern chat platforms, a bot is simply a variety of webhook - a small, API-like endpoint which reacts in some way to the messages sent to it. This response could be as simple as sending a chat message, it could be as complex as ordering a drone to deliver a package to your location.
One of the key things to note about this is that it fits into the "do something in response to an event" pattern that serverless architectures such as AWS Lambda have at their core. So rather than write a bot as a complex and heavyweight web API, we could instead describe it as a lambda function to process the messages it is sent. That means we're not spending money unless people are actually talking to our bot, and we don't have to worry too much about the technical implications of scaling it - just the financial ones.
In AWS world, this means getting API Gateway to do the heavy lifting for us (and provide the public-facing endpoint) so our lambda functions can concentrate on handling events. API Gateway is very powerful, but that also means it's a clunky old thing at the best of times, and hard to integrate well with version control or change management.
The solution is to get Terraform to handle the infrastructure for us. Although there's a bit more effort upfront to set up the scripts, making changes or rebuilding the infrastructure is as simple as updating the scripts and running terraform apply.
There are all sorts of platforms on which to run your bot - from good old IRC to embeddable webpage widgets. In this article, I'm going to look at one of the most popular: Facebook Messenger.
So what do we need to do, in order to go from zero to Messenger chatbot?
- Create Lambda functions to handle the incoming webhook requests
- Create Terraform scripts to build the infrastructure and deploy code to the AWS Lambda platform
- Set up a Facebook page for our bot and configure it to communicate with our webhook
The example code is available at https://github.com/mattkimber/facebook_messenger_example, but everything you need is also in the article if you prefer to follow along and build as you go.
Step 1 - Lambda Functions
As stated, we're integrating with Facebook's Messenger platform, which requires our webhook to expose two functions:
- A simple "keepalive" function which Facebook regularly calls with a specific secret token and challenge/response
in order to verify that your webhook is running. - A function to process the incoming messages.
Both are accessed via the same URL. The keepalive request will be sent via HTTP GET, and messages are sent via HTTP POST.
Keepalive
We'll look at the keepalive function first, as it's the simplest. Here's the source, in verify.js:
exports.handler = (event, context, callback) => {
    if (event.params.querystring["hub.mode"] === "subscribe" &&
        event.params.querystring["hub.verify_token"] === event["stage-variables"].facebook_verify_token) {
        callback(null, event.params.querystring["hub.challenge"])
    } else {
		console.log("Validation attempt failed.")
        callback("Failed validation. Make sure the validation tokens match.", null)
    }
}
This is taken from Facebook's example code, modified to work in the Lambda world. So instead of the more usual Express-style controller with req and res parameters, we receive event, context and callback:
- event - an object containing all the data which is passed to the Lambda function. In this case it will
be things like the query string, headers and environment variables that come from API Gateway; other use cases
will pass different things to the Lambda function. - context - information about the environment in which the Lambda function is running in.
- callback - a callback function which we can execute to signal success or failure. Its prototype is
callback(error, data)- in order to signal success we send the valuenullforerror.
Facebook will call our verify handler by making a GET request with a query string, e.g. http://{url}/webhook?hub.mode=subscribe&hub.verify_token=SECRET&hub.challenge=CHALLENGE. It expects for us to verify that SECRET is the value we expect, and for us to return the value CHALLENGE in the response body.
We use an integration request in API Gateway to transform query strings and environment variables into a single event object. In order to avoid putting secrets in our code we use API Gateway's notion of stage variables to hold our secrets - in this case the verification token.
Something to note about this code: it's small. Partly this is because I'm only writing the bare minimum necessary to illustrate how Facebook integration works, but it's also a general guideline to stick to. Lambdas should be simple and small - do one thing and do it well. If you need to trigger a sequence of events, then use a message queue which triggers additional Lambda functions rather than rolling your own monolith to deal with everything in one hit.
(If nothing else, large lambda functions are an excellent way to hit memory limits and execution timeouts)
Message processor
The Facebook developer platform communicates with our webhook by sending an HTTP POST with a JSON body, similar to the following:
{
  "object": "page",
  "entry": [
    {
      "id": 9876543210,
      "time": 1460620433256,
      "messaging": [
        {
          "sender": {
            "id": 123456789
          },
          "recipient": {
            "id": 987654321
          },
          " timestamp": 1460620433123,
          "message": {
            "mid": "mid.1460620432888:f8e3412003d2d1cd93",
            "seq": 12604,
            "text": "Testing Chat Bot .."
          }
        }
      ]
    }
  ]
}
In order to make a meaningful chat bot (or any other Facebook-integrated service) we need to take this message and process it in some way. For a chat bot, this usually means making calls to external services to find out information, then relaying it back to the user by calling the Facebook Graph API to send chat messages.
The message processor is a little more complicated than the verification code as we need to make these calls out to the Facebook Graph API. This means we need to reference an external package for those requests. So before writing any code we need to download the package. If you don't already have a package.json, open a terminal in the directory with the .js files and execute the following:
npm init- Accept the default values for each question for now
npm install --save request
If you already have a package.json with request listed as a dependency, then just run npm install to get everything installed.
With the packages set up, we can create the message processing code. Let's step through it section by section - the file is message_processing.js.
const request = require('request')

var ACCESS_TOKEN

exports.handler = (event, context, callback) => {
    ACCESS_TOKEN = event["stage-variables"].facebook_page_token

    if(event["body-json"].object == "page") {
        var entries = event["body-json"].entry
        entries.forEach((entry) => {
            entry.messaging.forEach(processMessage)
        })
    }

    callback(null, "")
}
Here we export the handler. You can see the same Lambda parameters and pattern from the verification handler. We get the access token from the stage variables to avoid putting secrets in our code, then we check the event we've received.
This example is less full-featured than Facebook's own, as I want to keep things simple (even if it results in code which is quite spartan and only really handles happy paths). All it's doing is checking to see if the message Facebook sends relates to a page, then processing each entry within that.
Let's take a look at the processMessage function next:
var processMessage = (message) => {
    var messageText = message.message.text

    if(messageText) {
		sendMessage(message.sender.id, "You said: " + messageText)
    }
}
Nothing complex here. For each message received, we relay it back to the user. The actual work is done by the sendMessage function, which is below:
var sendMessage = (recipient_id, message) => {
    var data = {
        recipient: {
            id: recipient_id
        },
        message: {
            text: message
        }
    }

    request({
        uri: 'https://graph.facebook.com/v2.6/me/messages',
        qs: { access_token: ACCESS_TOKEN },
        method: 'POST',
        json: data
    },
	function (error, res, body) {
		if (error) {
			console.error("Unable to send message. Response and error follow.")
			console.error(res);
			console.error(error);
		}
  })
}
This makes a call to the Facebook Graph API with the message content, using the request module. If it fails for any reason, we log the failure to the console. When the lambda is wired up and integrated with API Gateway, this console output will be redirected to CloudWatch logs. Again, this is very minimal and happy-path-only, but it'll do for proving the concept.
Deployment package
With the code completed, zip the folder to a file code.zip (or similar). This is what we'll upload to AWS using Terraform. It's important to make sure that both verify.js and message_processor.js are in the root directory of the zip file - otherwise AWS Lambda will not be able to find them.
Step 2 - Terraform
Before we start on the infrastructure scripts, a couple of guidelines for Terraform good practice:
- Use variables and resource outputs as much as possible - don't explicitly assume IDs or hardcode resources, let Terraform handle things.
- Don't put any access keys or secrets in your code. Program as if your code was going to end up in a public Github repository - any secrets must be supplied at runtime via command line or environment variable, ideally so your build or deployment server can inject them without developers knowing what they are.
You can see there's nothing really Terraform-specific there; it's just general good practice.
So what does our Terraform scripting look like? You can take my example code from https://github.com/mattkimber/facebook_messenger_example, or follow along with this article; I'll be listing all the code out in full.
Variables and Provider
To start, let's declare our variables. I like to keep everything in variables.tf so I can see all the variables I'm defining in one place. Here's my variables.tf:
# AWS settings

variable "region" {
	type = "string"
    default = "eu-west-1"
}

variable "access_key" {
	type = "string"
}

variable "secret_key" {
	type = "string"
}

variable "account_id" {
    type = "string"
}

# Facebook integration settings

variable "facebook_verify_token" {
	type = "string"
}

variable "facebook_page_token" {
    type = "string"
}
You can see here that there are two broad categories - AWS settings, and Facebook integration ones. Terraform's docs recommend being explicit about the type of variable (whether it's "string" or "map") - all of my variables here are strings.
Most are also secrets of some variety, so we don't supply any default value. Terraform will ask for their values when you run terraform apply, unless they are supplied via environment or command line parameter. Only the region has a default value, because it doesn't really matter that people know my code is running in eu-west-1.
Those with a bit of AWS and Terraform knowledge may find it odd that I explicitly ask for account_id on top of the secret key and access key. That's down to some clunkiness in the way permissions get specified on API Gateway and Lambda integrations; you'll see this come up later.
With the variables set up, I then move on to declaring the AWS provider. This is done in provider.tf:
provider "aws" {
	access_key = "${var.access_key}"
	secret_key = "${var.secret_key}"
	region = "${var.region}"
}
Here is where I use some of those variables I set up. There's nothing too complicated going on here. So let's move on to setting up the Lambda functions.
Lambda functions
I put all of my code in lambda.tf. Terraform doesn't really care that much about how you lay out your code; it just takes all of the .tf files in the directory, and you can do anything from having everything in one big file to having a file per statement. Do whatever helps you organise your infrastructure code!
lambda.tf has quite a bit going on, so I'm going to go through it section by section.
The first part is setting up some IAM roles and policies. The role is relatively simple:
resource "aws_iam_role" "iam_for_lambda" {
    name = "iam_for_lambda"
    assume_role_policy = <<EOF
{
        "Version": "2012-10-17",
        "Statement": [
            {
                "Action": [
                    "sts:AssumeRole"
                ],
                "Principal": {
                    "Service": "lambda.amazonaws.com"
                },
                "Effect": "Allow",
                "Sid": ""
            }
        ]
}
    EOF
}
Essentially this lets the Lambda service assume the role we're declaring, and that's about it. I've left the JSON inline here to keep things simple, but ideally you'd want to put it in its own file and use Terraform's built-in ${file()} functionality so you don't litter your .tf files with IAM statements.
If all we want to do is run Lambda functions and don't care about accessing any other AWS resources, this simple role declaration would be sufficient. However, that approach would make our system very hard to debug, because it wouldn't have any permissions to write to CloudWatch. Since CloudWatch logs are your major tool for finding out what's going on with a lambda function, we also need a policy which allows access to CloudWatch:
resource "aws_iam_policy" "lambda_policy" {
    name = "lambda_policy"
    description = "Policy for Lambda functions which allows logging"
    policy = <<EOF
{
  "Version": "2012-10-17",
  "Statement": [
    {
      "Effect": "Allow",
      "Action": [
        "logs:CreateLogGroup",
        "logs:CreateLogStream",
        "logs:PutLogEvents",
        "logs:DescribeLogStreams"
    ],
      "Resource": [
        "arn:aws:logs:*:*:*"
    ]
  }
 ]
}
    EOF
}
Again, there's nothing too complex going on here, from an IAM point of view. We're setting up a policy that allows users to create log groups and streams, describe them, and push events to them. This can be done anywhere in CloudWatch, as the Resource is a very broad arn:aws:logs:*:*:*
The policy by itself won't do much, so we also need to attach it to the role:
resource "aws_iam_policy_attachment" "lambda_policy_attachment" {
    name = "lambda_policy_attachment"
    roles = ["${aws_iam_role.iam_for_lambda.name}"]
    policy_arn = "${aws_iam_policy.lambda_policy.arn}"
}
Note that we start using the return variables Terraform generates for us here. So rather than trying to hardcode the policy or guess what the resource name might be, we just use ${aws_iam_role.iam_for_lambda.name} and it's all handled for us. Far easier than hunting through the web front end or trying to pass values in and out of the CLI tools!
Note that roles here is actually an array - we could attach the policy to multiple roles in a single statement if we wished.
With security out of the way, we now declare our Lambda functions. Firstly, the verification handler that will be used for HTTP GET:
resource "aws_lambda_function" "verify_webhook" {
    function_name = "verify_webhook"
    filename = "files/code.zip"
    role = "${aws_iam_role.iam_for_lambda.arn}"
    handler = "verify.handler"
    runtime = "nodejs4.3"

    # This is necessary if you want Terraform/AWS to identify that
    # the code has been updated
    source_code_hash = "${base64sha256(file("files/code.zip"))}"
}
There's a fair amount going on here, so let's break it down. function_name is fairly self-evident. We also tell Terraform where to find the code with filename; in this instance we're going to upload a ZIP file to AWS Lambda, which is the recommended option for code which is split across multiple files including modules.
We then tell AWS what role to run the Lambda under using role. This is the one we set up earlier by allowing AWS Lambda the sts:AssumeRole permission and attaching a policy giving access to CloudWatch.
Next are some details which tell AWS Lambda how to run the function. We ask for the nodejs4.3 runtime; by default Lambda will use an extremely old version of Node.js which doesn't support newer language features. You can also specify alternative runtimes such as Python here.
We also tell Lambda which module it needs to execute. This can be a little confusing if you don't know the format of this field, which is {filename}.{exported method name}. So if you want to call a method which is exported as exports.myMethod in a file called myfile.js, you'd specify a handler of myfile.myMethod. Here we want to call the method handler from verify.js, so we put this as our handler.
The last part in that statement is the source_code_hash field. I found that this was necessary if you wanted Terraform to update your code when it changed - otherwise it would only check whether code.zip existed, and not whether it was the latest version. You can see another handy Terraform built-in function here: ${base64sha256()} computes a Base-64 encoded SHA-256 checksum of the input. You can see all the functions available on this page: https://www.terraform.io/docs/configuration/interpolation.html
After setting up the function, we also need to grant some permissions on it:
resource "aws_lambda_permission" "allow_api_gateway_verify" {
    statement_id = "AllowExecutionFromApiGateway"
    action = "lambda:InvokeFunction"
    function_name = "${aws_lambda_function.verify_webhook.arn}"
    principal = "apigateway.amazonaws.com"
}
This allows Amazon API Gateway to call our Lambda function. Without this statement, we'd get an error when we tried to hook up our function into API Gateway.
We then do the same for the HTTP POST handler which will process incoming messages:
 resource "aws_lambda_function" "process_webhook" {
    function_name = "process_webhook"
    filename = "files/code.zip"
    role = "${aws_iam_role.iam_for_lambda.arn}"
    handler = "message_processing.handler"
    runtime = "nodejs4.3"
    timeout = 30

    # This is necessary if you want Terraform/AWS to identify that
    # the code has been updated
    source_code_hash = "${base64sha256(file("files/code.zip"))}"
}

resource "aws_lambda_permission" "allow_api_gateway_process" {
    statement_id = "AllowExecutionFromApiGateway"
    action = "lambda:InvokeFunction"
    function_name = "${aws_lambda_function.process_webhook.arn}"
    principal = "apigateway.amazonaws.com"
}
This is very similar in form - although I set an explicit value for timeout here as the default of 3 seconds may not be long enough to do complex message processing or call external services. Be wary that setting off lots of long-running lambda functions could get expensive: they're billed according to (memory allocated * time spent executing)
API Gateway Integration
Now that we have the Lambda functions set up (or at least scripted) we need to hook them up to API Gateway. I put all of my code in the predictably-named api_gateway.tf file.
First, we declare a new REST API, and give it a single path - /webhook:
resource "aws_api_gateway_rest_api" "MessengerApi" {
    name = "FacebookMessengerBot"
    description = "A demo chatbot for Facebook Messenger"
}

resource "aws_api_gateway_resource" "MessengerWebhook" {
    rest_api_id = "${aws_api_gateway_rest_api.MessengerApi.id}"
    parent_id = "${aws_api_gateway_rest_api.MessengerApi.root_resource_id}"
    path_part = "webhook"
}
We can now add definitions for our GET and POST requests. In order to integrate a Lambda function with API Gateway, we need four distinct parts:
- A Method Request which handles the request and, if necessary, authentication
- An Integration Request which maps inbound request parameters to a Lambda event
- An Integration Response which maps the Lambda output to an HTTP response
- A Method Response which sets headers and models according to the status code set in the integration response
Let's start with the GET request. First we start with the Method Request:
resource "aws_api_gateway_method" "WebhookGet" {
    rest_api_id = "${aws_api_gateway_rest_api.MessengerApi.id}"
    resource_id = "${aws_api_gateway_resource.MessengerWebhook.id}"
    http_method = "GET"
    authorization = "NONE"
}
This is pretty simple, so move on to the Integration Request:
resource "aws_api_gateway_integration" "WebhookGetIntegration" {
    rest_api_id = "${aws_api_gateway_rest_api.MessengerApi.id}"
    resource_id = "${aws_api_gateway_resource.MessengerWebhook.id}"
    http_method = "${aws_api_gateway_method.WebhookGet.http_method}"
    integration_http_method = "POST"
    type = "AWS"
    uri = "arn:aws:apigateway:${var.region}:lambda:path/2015-03-31/functions/arn:aws:lambda:${var.region}:${var.account_id}:function:${aws_lambda_function.verify_webhook.function_name}/invocations"
    request_templates = {
        "application/json" = "${file("templates/get_inbound_mapping.template")}"
    }
}
One slight oddity here is that although the HTTP method is GET, we set integration_http_method to POST. This is because integration_http_method refers to the output of the integration, and all Lambda functions integrated into API Gateway are invoked via POST.
(This is also useful for integrating with non-RESTful APIs, e.g. using API Gateway to provide a RESTful façade on top of a SOAP API)
This statement is also where we start bumping into some Terraform and AWS ugliness. There's no nice, automated way of building the URI for a Lambda function invocation, so we have to build it ourselves using the long string in that uri field. This is why we need to ingest the account ID as a variable; without it, we can't build the URI for the Lambda invocation.
We also declare a mapping template using Terraform's ${file()} functionality. As well as being a cleaner approach, this is necessary for the mapping templates as they tend to have a lot of characters which need to be escaped if they're placed in a Terraform file verbatim.
templates/get_inbound_mapping.template is slightly complex - the listing for it is:
#set($allParams = $input.params())
{
    "body-json" : $input.json('$'),
    "params" : {
        #foreach($type in $allParams.keySet())
        #set($params = $allParams.get($type))
        "$type" : {
            #foreach($paramName in $params.keySet())
            "$paramName" : "$util.escapeJavaScript($params.get($paramName))"
            #if($foreach.hasNext),#end
            #end
        }
    #if($foreach.hasNext),#end
    #end
},
"stage-variables" : {
    #foreach($key in $stageVariables.keySet())
        "$key" : "$util.escapeJavaScript($stageVariables.get($key))"
        #if($foreach.hasNext),#end
        #end
    }
}
Don't worry too much about the details of this - what it does is take all query string parameters, deployment environment variables, and so on, and send them to the Lambda function's event parameter.
With the inbound path for GET requests completed, we now need to set up the outbound response path.
First, the Method Response:
resource "aws_api_gateway_method_response" "Get_200" {
  rest_api_id = "${aws_api_gateway_rest_api.MessengerApi.id}"
  resource_id = "${aws_api_gateway_resource.MessengerWebhook.id}"
  http_method = "${aws_api_gateway_method.WebhookGet.http_method}"
  status_code = "200"
}
Nothing complex here - we're only dealing with the happy path in this example, so the only response needed is 200.
Next, the Integration Response:
resource "aws_api_gateway_integration_response" "WebhookGetIntegrationResponse" {
  depends_on = ["aws_api_gateway_integration.WebhookGetIntegration","aws_api_gateway_method.WebhookGet"]
  rest_api_id = "${aws_api_gateway_rest_api.MessengerApi.id}"
  resource_id = "${aws_api_gateway_resource.MessengerWebhook.id}"
  http_method = "${aws_api_gateway_method.WebhookGet.http_method}"
  status_code = "${aws_api_gateway_method_response.Get_200.status_code}"
  response_templates = {
    "application/json" = "${file("templates/get_outbound_mapping.template")}"
  }
}
Note the depends_on field. This tells Terraform that the resources specified in the array need to exist before it tries to create this resource. Although Terraform is normally quite good at figuring out which order to do things in, you can sometimes run into trouble with AWS's eventual consistency, and get errors because you're depending on a resource which doesn't exist yet. depends_on makes Terraform wait until all of the necessary resources have been created.
Overall that code doesn't look so bad, but there's a horror lurking in the templates/get_outbound_mapping.template file:
#set($inputRoot = $input.path('$'))
$inputRoot
See, by default API Gateway converts responses to JSON. So if you respond with the string string, what gets delivered to the browser is actually "string". The problem is that Facebook's developer platform does a challenge-response to the verify endpoint. It sends something like ...&challenge=12345 and expects the webhook to return the raw value 12345. If we return "12345" then this won't be accepted.
The above two-line template essentially serves to "de-JSONify" the response and ensure Facebook gets the raw value.
With the GET request set up, we do the same for the POST request:
resource "aws_api_gateway_method" "WebhookPost" {
    rest_api_id = "${aws_api_gateway_rest_api.MessengerApi.id}"
    resource_id = "${aws_api_gateway_resource.MessengerWebhook.id}"
    http_method = "POST"
    authorization = "NONE"
}

resource "aws_api_gateway_integration" "WebhookPostIntegration" {
    rest_api_id = "${aws_api_gateway_rest_api.MessengerApi.id}"
    resource_id = "${aws_api_gateway_resource.MessengerWebhook.id}"
    http_method = "${aws_api_gateway_method.WebhookPost.http_method}"
    integration_http_method = "POST"
    type = "AWS"
    uri = "arn:aws:apigateway:${var.region}:lambda:path/2015-03-31/functions/arn:aws:lambda:${var.region}:${var.account_id}:function:${aws_lambda_function.process_webhook.function_name}/invocations"
    request_templates = {
        "application/json" = "${file("templates/get_inbound_mapping.template")}"
    }
}

resource "aws_api_gateway_method_response" "Post_200" {
  rest_api_id = "${aws_api_gateway_rest_api.MessengerApi.id}"
  resource_id = "${aws_api_gateway_resource.MessengerWebhook.id}"
  http_method = "${aws_api_gateway_method.WebhookPost.http_method}"
  status_code = "200"
}

resource "aws_api_gateway_integration_response" "WebhookPostIntegrationResponse" {
  depends_on = ["aws_api_gateway_integration.WebhookPostIntegration","aws_api_gateway_method.WebhookPost"]
  rest_api_id = "${aws_api_gateway_rest_api.MessengerApi.id}"
  resource_id = "${aws_api_gateway_resource.MessengerWebhook.id}"
  http_method = "${aws_api_gateway_method.WebhookPost.http_method}"
  status_code = "${aws_api_gateway_method_response.Post_200.status_code}"
}
This is more or less the same, although this time we don't need the hacky output template.
Before we can use this API, we'll need to deploy it to an environment with a URL we can access. In API Gateway, this is called a stage - which can be live, test, qa, whatever. Each gets a different URL, and you can also set up stage variables; these are equivalent to environment variables, and allow you to run the same code everywhere and configure by environment. This is very useful if your "test" stage needs to call different service URLs or use different secret keys to your "live" stage.
The stage definition looks like this:
resource "aws_api_gateway_deployment" "MessengerApiDeployment" {
  depends_on = ["aws_api_gateway_integration.WebhookGetIntegration","aws_api_gateway_integration.WebhookPostIntegration"]
  rest_api_id = "${aws_api_gateway_rest_api.MessengerApi.id}"
  stage_name = "test"
  stage_description = "Deployment stage for testing"
  variables = {
    "facebook_page_token" = "${var.facebook_page_token}"
    "facebook_verify_token" = "${var.facebook_verify_token}"
	}
}
You can see that we need to wait for the integrations to be set up (another depends_on array) and also that we inject our secrets as stage variables.
Running
It's good practice to verify what Terraform is going to do before trying to build the infrastructure. In order to do this, we need to run terraform plan in the directory with all the .tf files. This will ask for values for all the variables when it runs. You'll need AWS credentials (access key, secret key and account ID) for a valid AWS account that is able to set up resources. You won't have a value for facebook_page_token yet, so just enter a random string. For facebook_verify_token, make something up and remember it.
Depending on your setup and path you may need to explicitly state the full path to the Terraform binary - for me, this was /usr/local/terraform/bin/terraform.
If the plan looks like it will create what you expect, you can then run terraform apply. This will ask for the variables again. Alternatively, you can specify them directly on the command line as follows:
/usr/local/terraform/bin/terraform apply -var 'access_key=...' -var 'secret_key=...' -var 'account_id=...' -var 'facebook_page_token=...' -var 'facebook_verify_token=...'
But be careful as this may result in all of your secrets ending up in your command line history - or even in source control if you script it and then don't put the script in your .gitignore
Terraform will run through and create the infrastructure. Assuming all has gone well, we can now start integrating our code with Facebook's developer platform.
Important: when Terraform runs, it will output a .tfstate file. This is a very important file - it keeps track of all the operations Terraform has applied to the infrastructure. Terraform doesn't interrogate AWS to find out what exists and what doesn't; it relies on the .tfstate file. If you lose this, or make changes to the infrastructure which aren't reflected there, Terraform will likely fail or, worse, do weird things the next time you run it.
For production systems, it's best to store the state files somewhere secure where everyone can access them, for example on a versioned S3 bucket. The Terraform documentation offers some advice on how to do that here: https://www.terraform.io/docs/state/remote/s3.html
Step 3 - Facebook Integration
Now we have our code up and running in AWS, we can start integrating with it. Facebook have a very good "getting started" guide for the Messenger platform (https://developers.facebook.com/docs/messenger-platform/quickstart) but there are a few things we need to do differently where we're using API Gateway.
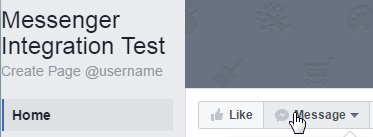
To start with, you'll need to create a Facebook page. Yes, I'm telling you to log into Facebook at work!
The user interface moves around a little and things may not always be in the same place, but I found the option to create a page here:
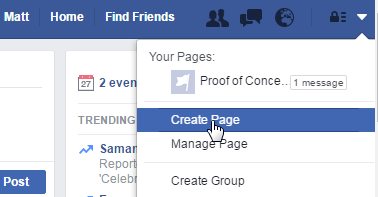
You'll then be asked to select the type of page, and enter some details. I chose "Brand or Product" and then a category of "App Page". This will then take you to a wizard, but you can skip most of these steps.
Finally, we want to make the page private. Click "Settings":

Then under "Page visibility", unpublish the page:
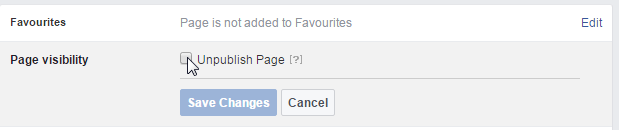
This means nobody can see our test page, and we're free to experiment.
Next, go to the Facebook developer portal - https://developers.facebook.com/
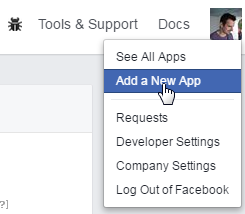
From the dropdown on the top right, select "Add a new app":
Then select the "Basic setup" option link at the bottom below the mobile app and website selection buttons. You'll then get a page to configure your app:
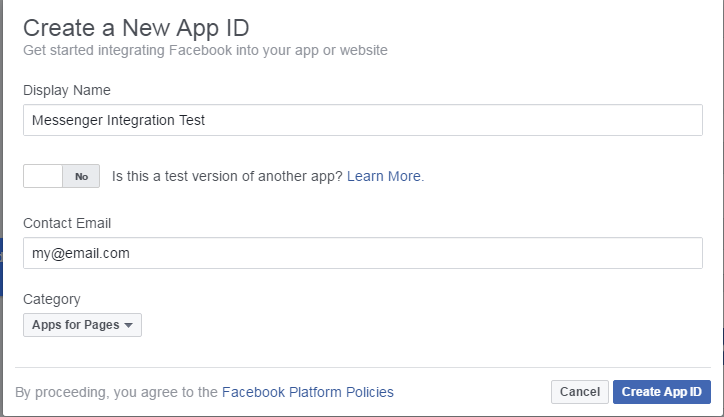
After this, click "Create App ID". You'll be taken through a quick Captcha-style test, after which you'll see the developer portal. Scroll down to "Webhooks" and click "Get Started":

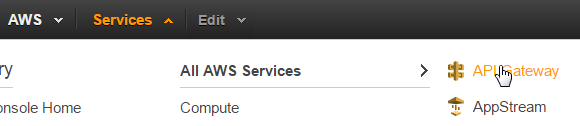
Click "New Subscription" and then "Page". You'll notice that this asks us for a callback URL. We need to get this from AWS - so open the AWS console in a new tab. From the "Services" menu, choose "API Gateway":
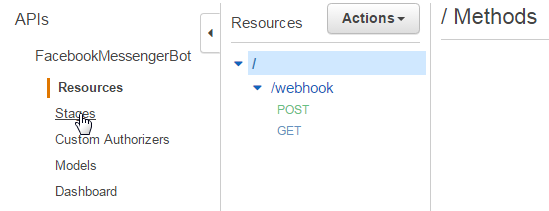
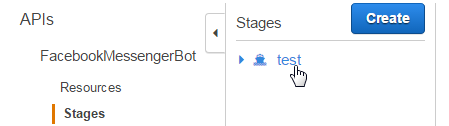
You should see the "FacebookMessengerBot" API Gateway. Click on it, and you'll be taken to a screen showing the webhook and the two HTTP methods we defined. From here, click "Stages":
Then click the "test" stage:
This will show you the URL where your endpoint is hosted:

Copy this into the New Page Subscription on the Facebook developer portal (don't forget that the webhook is in /webhook) and enter in the value you used for facebook_verify_token in your Terraform scripts. Then tick the boxes for events message_deliveries, messages, messaging_optins and messaging_postbacks.
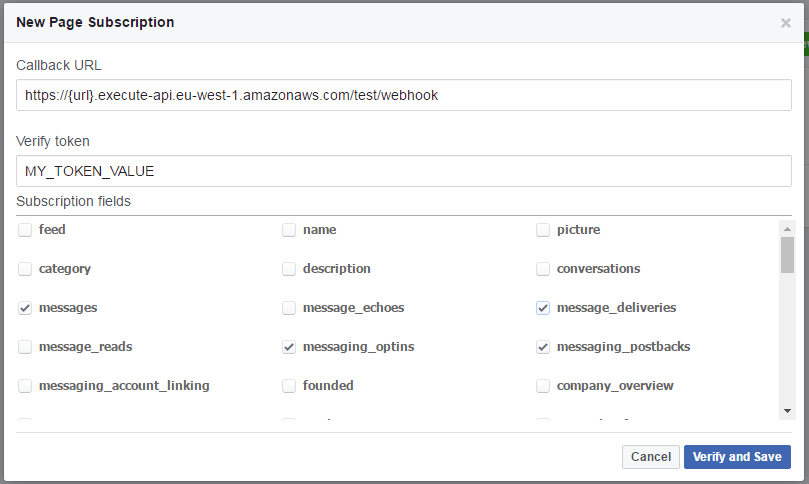
After this, click "Verify and Save".
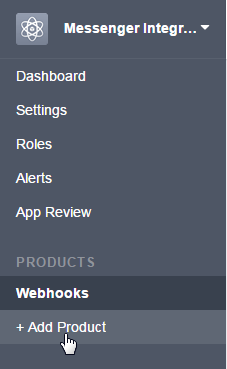
Next we need to add the Messenger integration. Click "Add Product" on the left hand menu:
Scroll down to "Messenger" and click "Get Started". This will display a quick warning about acceptable use, then take you to the next page once you accept. You'll see here that the webhook is already configured, but we now need to subscribe to a page.
First, let's get an access token. Remember how when we set up the infrastructure with Terraform we had to put in a junk value? Now we can get the real one. Select your page from the "Token Generation" section:
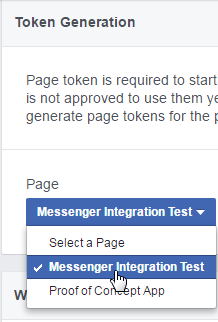
This will ask for some additional permissions, then display a token in the "Page Access Token" box. Click on the token to copy it.
Before proceeding further, we need to put this in our Terraform-managed infrastructure. So run terraform plan and terraform apply again, using the new value for facebook_page_token. For example, if the token you got from Facebook was "ABCDEFG", then run Terraform using -var 'facebook_page_token=ABCDEFG'. Terraform will
check the state and apply the change. You should see Apply complete! Resources: 1 added, 0 changed, 1 destroyed. in the output, as we've only made 1 alteration.
If you want to verify that the change has been made, you can go to the stage in API Gateway in the Amazon console, and check the "Stage Variables" tab to make sure your new value has been placed there.
Now that we have the correct token, we can subscribe our webhook to the page events. In the "Webhooks" section, select the page to create the subscription:

And click "Subscribe"
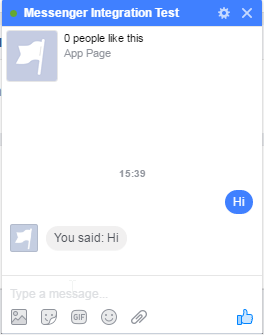
Now, go to the page and send it a message!